Now Reading: How to Remove Hard Drive From Dell Laptop
-
01
How to Remove Hard Drive From Dell Laptop

How to Remove Hard Drive From Dell Laptop
To remove the hard drive from a dell laptop, turn off the laptop and unplug it. Then, locate the hard drive compartment and remove the screws holding it in place before gently pulling it out.
When it comes to upgrading or replacing parts on your dell laptop, removing the hard drive is a common task. Whether you’re replacing a failing hard drive or upgrading to a larger capacity, removing the hard drive from your dell laptop requires careful handling to prevent damage.
In this article, we’ll guide you through the steps necessary to remove the hard drive from your dell laptop. We’ll also cover some precautions you should take before starting the process to protect your laptop and ensure a successful hard drive removal.

Credit: www.parts-people.com
Understanding Hard Drives: An Introduction
A hard drive is an integral part of a laptop. It stores all the digital data of a system. Understanding the anatomy of a hard drive is the first step in removing it from a dell laptop. Hard drives are available in two types – solid-state and hard-disk.
A hard disk is a mechanical device, whereas a solid-state drive operates with no moving parts. A hard drive plays a critical role in storing, retrieving and accessing data on a laptop. So, it’s important to remove it from a dell laptop with care and caution.
By following the necessary precautions, one can safely remove a hard drive from their dell laptop and upgrade it.
Signs Indicating Your Laptop Hard Drive Needs To Be Removed
A few signs could indicate that your dell laptop hard drive needs to be removed. If strange sounds emanate from the hard drive, it may be time for a replacement. Blue screen errors and frequent crashes also suggest that the hard drive is malfunctioning.
Additionally, slow booting and sluggish performance may be due to a damaged hard drive. If you experience any of these issues, it may be time to replace your hard drive. Remember, don’t wait until it’s too late, make sure to back up all files before removing your hard drive.
How To Remove Hard Drive From Dell Laptop
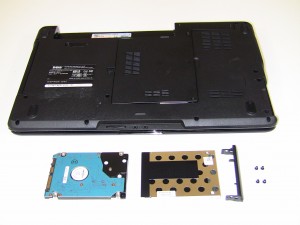
Removing the hard drive from your dell laptop is a fairly simple task, but it’s important to take necessary precautions beforehand. Firstly, shut off all power sources and disconnect any cables and external devices. You’ll need a few tools such as a screwdriver and an anti-static wrist strap to avoid any damage to the hard drive.
Next, locate the hard drive bay cover and remove it carefully to access the hard drive. Finally, remove the screws holding the hard drive in place and gently disconnect it from its connector. Remember to keep the screws and cover in a safe place for reassembly later.
By following these steps, you can easily remove your dell laptop hard drive without any hassle.
Tips For Maintaining Your Hard Drive Health
Maintaining your hard drive is crucial for the longevity of your dell laptop. Updating the hard drive firmware is an essential step that ensures compatibility and improved performance. Keeping the laptop clean and dust-free is also a must as debris can cause damage to the hard drive.
Using software to monitor hard drive health is another smart move as it can detect errors and notify you of potential issues before they become bigger problems. Taking these steps will not only ensure the health of your hard drive but also improve the overall performance of your dell laptop.
Remember, prevention is always better than cure when it comes to technology.
Frequently Asked Questions Of How To Remove Hard Drive From Dell Laptop
How Do I Remove The Hard Drive From A Dell Laptop?
To remove the hard drive, you need to turn off your laptop, disconnect the charger, and remove the battery. Then, locate the hard drive compartment and remove its screws. Gently slide out the hard drive, disconnect the connector, and remove the drive from the laptop.
Is It Easy To Remove The Hard Drive From A Dell Laptop?
Yes, removing the hard drive from a dell laptop is easy and straightforward. However, before removing it, make sure you back up your important files to avoid losing them. Also, follow the instructions on how to remove the hard drive carefully.
Why Do I Need To Remove The Hard Drive From My Dell Laptop?
Removing the hard drive might be necessary, especially if you want to replace it with a new one or upgrade the laptop’s storage. Also, in case you want to dispose of or sell the laptop, removing the hard drive is recommended to keep your data secure.
Can I Remove The Hard Drive From A Dell Laptop By Myself?
Yes, you can remove the hard drive from a dell laptop by yourself. However, if you’re not confident with your skills, you can seek assistance from a qualified technician. Additionally, ensure you have the required tools to avoid damaging the laptop or the hard drive.
What Tools Do I Need To Remove The Hard Drive From My Dell Laptop?
To remove the hard drive from your dell laptop, you need a phillips head screwdriver. The screwdriver’s size might vary depending on the laptop’s model. Also, ensure you have an antistatic wrist strap to avoid damaging the laptop’s components due to static electricity.
Conclusion
Removing a hard drive from a dell laptop may seem like a daunting task, but by following the steps outlined in this article, it can be accomplished with ease. Start by gathering the necessary tools and materials and powering down the computer.
Then, locate and access the hard drive bay and remove any screws or mounting brackets holding it in place. Gently disconnect the hard drive from its wire connectors and carefully remove it from the bay. Finally, close up the laptop and power it back on.
With a bit of patience and attention to detail, you can successfully remove your hard drive from your dell laptop and upgrade or replace it as needed. Remember to keep your old hard drive safe and backed up, just in case anything were to go wrong during the process.
Now go forth and upgrade your laptop with confidence!


