Now Reading: How to Put Stickers on a Laptop
-
01
How to Put Stickers on a Laptop

How to Put Stickers on a Laptop
To put stickers on a laptop, clean the surface, peel off the sticker backing, and carefully apply it to the desired area, smoothing out any air bubbles. When placing multiple stickers, please start with the largest ones first and layer them as desired.
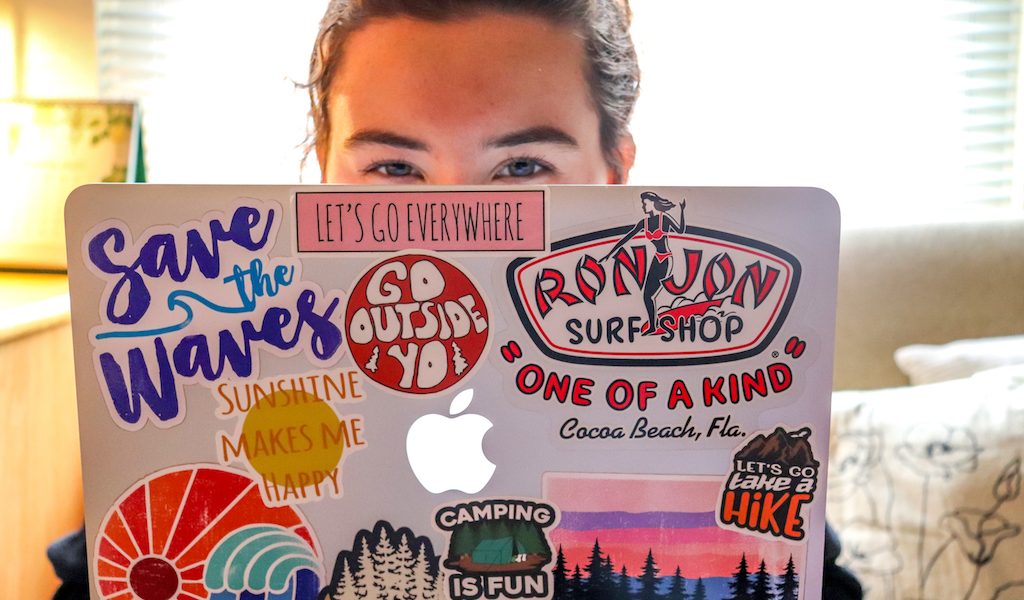
Credit: www.liberty.edu
Different Types Of Stickers For Laptops
Stickers are a fun way to personalize your laptop and make it stand out. Various types of stickers are available for notebooks, each offering a unique style and statement. Popular categories for laptop stickers include nature, animals, quotes, pop culture references, and abstract designs.
You can choose from vinyl, paper, or clear stickers regarding materials and finishes. Vinyl stickers are durable and waterproof, making them perfect for long-lasting use. Paper stickers are more affordable and easy to remove if you want to change them frequently.
Clear stickers give a sleek and transparent look, allowing your laptop’s original design to shine. Whichever type of sticker you choose, clean the laptop surface before applying and carefully place the sticker to avoid air bubbles.
With a wide range of options, you can easily find stickers matching your style and interests.
Importance Of Preparing Your Laptop
Preparing your laptop before applying stickers is essential. Begin by cleaning the laptop surface thoroughly. Remove any existing stickers or residue carefully. Use a mild cleaning solution and a soft cloth to wipe away dirt and grime. Ensure the surface is dry before proceeding.
It’s advisable to choose stickers that are specifically designed for laptops. Measure and position the stickers accurately before applying them. Start by peeling a small portion of the sticker’s backing and aligning it with the laptop’s corners or edges. Slowly press down the sticker while removing the support.
Smooth out any air bubbles or creases as you go. Take your time and patience to achieve a clean and professional-looking result. Remember to avoid forcefully removing stickers in the future to prevent any damage to your laptop’s surface.
Steps To Apply Stickers On A Laptop
Putting stickers on a laptop is a fun way to personalize your device. First, select the ideal spot for each sticker. Gently peel off the sticker backing, taking care not to tear it. Next, position the sticker properly on the laptop’s surface.
Smooth out any air bubbles or creases with your fingertips. Following these steps is essential to ensure a clean and professional appearance. Avoid starting sentences with common phrases like “when it comes to” or “if you. ” Keep your sentences short, with a maximum of 20 words each.
You can maintain the reader’s interest by using various phrases and avoiding repetition. Remember to write in an active voice and stay away from generic conclusions. Strive to create SEO-friendly and engaging content that readers will enjoy.
Tips For Long-Lasting Stickers
Putting stickers on a laptop can be fun to personalize your device. Consider using a clear coat or laminate to protect the stickers to ensure they last longer. This helps to prevent them from peeling or fading over time.
Additionally, avoiding exposing your laptop to extreme heat or moisture is essential, as this can damage the stickers. Regular maintenance and cleaning of the stickers is also recommended. Gently wipe them with a soft cloth and avoid using harsh chemicals that may cause discoloration.
By following these tips, you can enjoy your laptop stickers for a long time without worrying about them becoming damaged or losing their vibrancy. Now, you have a laptop that truly reflects your unique style!
Removing Stickers From A Laptop
To remove stickers from a laptop, use heat to loosen stubborn ones. Gently peel off the sticker without damaging the laptop surface. If there is any adhesive residue left, it can be removed with adhesive remover or rubbing alcohol. By following these steps, you can effectively take stickers off your laptop without causing any harm.
Where To Find Unique Laptop Stickers
Are you looking for unique laptop stickers? Look no further than online marketplaces! They offer a vast selection of stickers to customize your laptop. Want to support local businesses? Check out the nearby stores or events that sell laptop stickers. Choose from a variety of designs and styles to showcase your style.
With these options, you can easily find stickers that match your interests and personality. The online marketplaces and local stores provide a convenient way to find and purchase laptop stickers to make your device stand out.
Don’t hesitate—start browsing now and give your laptop a unique and eye-catching look!
Frequently Asked Questions
Stickers on a laptop are a fun way to personalize your device. Many people wonder if stickers can damage their computers. The answer is it depends. Poor-quality stickers or excessive adhesive can leave residue on your computer. This residue can be difficult to remove and may damage the laptop’s surface.
However, if you use high-quality stickers and apply them carefully, they should not damage your laptop. Another concern is whether stickers can affect laptop performance. Generally, stickers do not have any direct impact on performance. However, if a sticker covers an air vent or gets in the way of a cooling fan, it can cause overheating.
Lastly, removing stickers without leaving residue is possible. Gently peel off the sticker and clean any residue with rubbing alcohol or a specialized adhesive remover. These precautions will help ensure a positive sticker experience without damaging your laptop.
Frequently Asked Questions On How To Put Stickers On A Laptop
How Do I Clean My Laptop Before Applying Stickers?
Can I Remove Stickers From My Laptop Without Damaging It?
How Can I Prevent Stickers From Peeling Off My Laptop?
How Can I Arrange Multiple Stickers On My Laptop?
Can I Put Stickers On A Laptop With A Textured Surface?
Conclusion
In summary, applying stickers to your laptop can be a fun and creative way to personalize and enhance its appearance. You can ensure a smooth and long-lasting application by following the step-by-step process outlined in this blog post. First, clean the surface thoroughly to ensure the stickers adhere correctly.
Next, carefully position and apply the stickers, smoothing out any air bubbles or wrinkles. Lastly, consider adding a protective layer to keep the stickers in place. Remember, stickers can be easily removed if you change your mind or want to change the design.
Just peel them off gently and clean any adhesive residue. With these tips, you can confidently showcase your unique style and give your laptop a new look. So, go ahead and have fun expressing yourself through stickers!